ProctorU Live+ is a live proctoring solution utilized by Lone Star College that allows online and distance learners to take proctored exams without needing to visit a Testing Center. All quizzes taken in ProctorU, with the exception of Practice Quizzes, are taken by students in front of a live Proctor, who will monitor your surroundings and entire desktop throughout the exam. There is no cost to students to use ProctorU Live+.
NOTE: On November 6, 2025, ProctorU is retiring the legacy ProctorU Chrome and Firefox extensions. After this release, you will see an error message when attempting to connect to your exam using the legacy browser extension. Follow these instructions to uninstall any legacy ProctorU extensions from Chrome and/or Firefox.
Getting Started with the ProctorU Platform
Follow this step-by-step process to prepare yourself for your exam:
-
Sign Up
Create a Test-Taker ProctorU Account.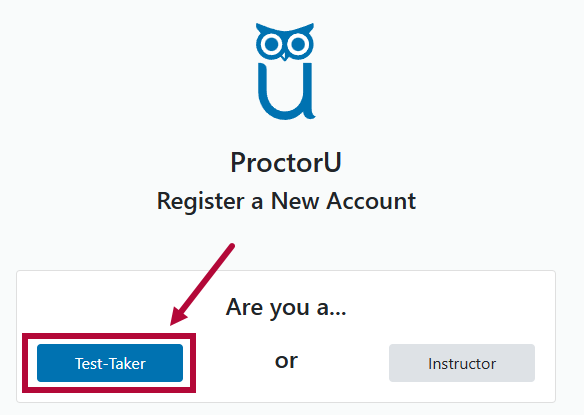
-
Download the Guardian Browser
Make sure you Download and Install the Guardian Browser. You can find out where to download Guardian and how to install it within the linked article.
- Scheduling
If you will have a live human-proctored launch, you’ll need to Schedule Your Exam.
If your exam launch will be automated, you do not need to schedule an appointment and may take your exam at any time through D2L. -
Check Your Equipment
Test Your Equipment to make sure your hardware is compatible with ProctorU. -
Find an Acceptable Space to Take Your Exam
The environment needs to be quiet, well-lit, and away from other people. The workspace area needs to be free of all materials other than Materials Allowed During Your Exam. Using a hard surface for a workspace is required; beds or couches are not permitted. -
Become Familiar with Materials Required for Your Exam
Review the List of Required Materials you will need to begin your exam. The linked article also provides guidance for determining whether you will be permitted any outside resources during your exam. -
Coordinate Accommodations with Your Instructor or Exam Facilitator
If you require any special accommodations such as additional time, additional breaks, etc., you’ll need to Follow these Guidelines prior to your exam day.

Accessing ProctorU
- Open your course in D2L, navigate to [Course Activities] → [Quizzes].
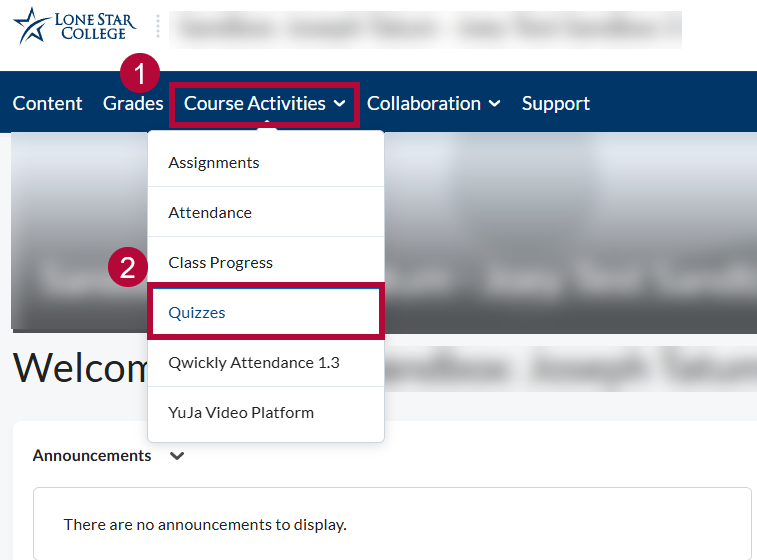
- Click on the [ProctorU quiz] that is set by your instructor.
NOTE: The phrase ProctorU does not need to be included in the quiz name.
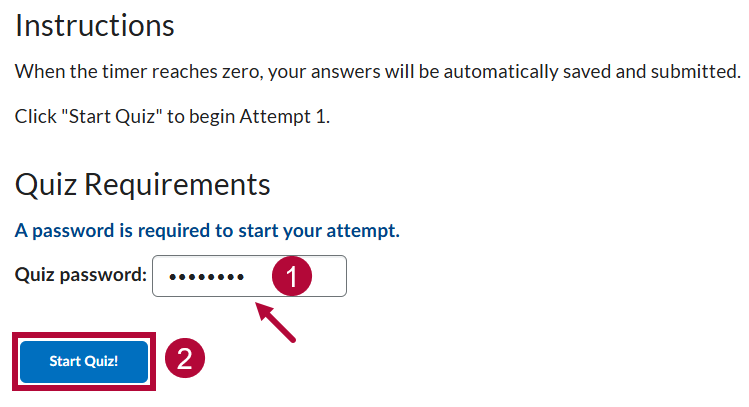
- Enter the quiz password provided by your instructor or proctor.


ProctorU Guide for Test-Takers
ProctorU has provided the following resources for students. Please refer to these resources for navigating the ProctorU Dashboard, and taking exams through ProctorU. We strongly recommend viewing these before taking any quizzes using ProctorU.
NOTE: When taking your quiz, you will see a list of test-taking rules that must be followed. Accommodations you have during testing will not be shown, but your proctor will go over any Accommodations you have before you start the quiz. If there is any issue with the accommodations, please contact your Instructor.
ProctorU Troubleshooting & Support
- If you have issues with the ProctorU website, you can refer to this Troubleshooting Guide provided by ProctorU.
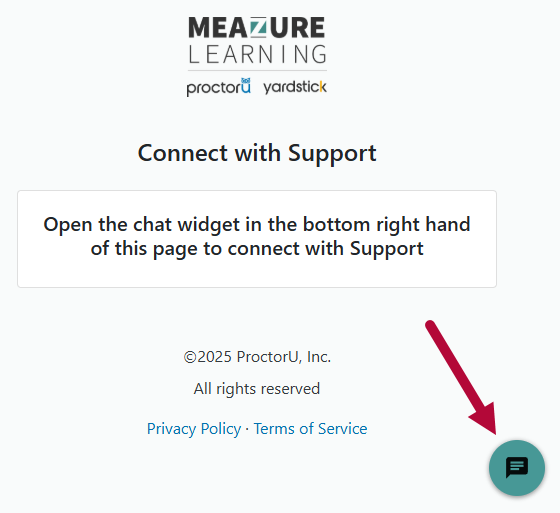
- You can also contact the Test Taker Support Contact Page via phone, email, or through live-chat Support.
- 24/7 Live-Chat Support can be found on the ProctorU site under [Chat Bubble] icon.